Centos8下 K8S 安装配置Mysql8 多主MGR
AI 摘要 / TL;DR
Centos8下 K8S 安装配置Mysql8 多主MGR 来源: https://www.ucloud.cn/yun/130047.html 作者: IT那活儿 发布日期: 发布于2023 01 11 13:20 Centos8下 K8S 安装配置Mysql8 多主MGR https://ucloud blog.cn
来源: https://www.ucloud.cn/yun/130047.html 作者: IT那活儿 发布日期: 发布于2023-01-11 13:20
Centos8下 K8S 安装配置Mysql8 多主MGR

一.环境配置
k8s环境:1台master节点,3台node节点。
192.168.37.128 k8s1 192.168.37.130 k8s2 192.168.37.131 k8s3 192.168.37.129 k8s4 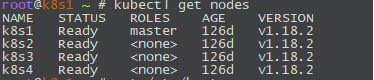 |
二.搭建步骤

1、准备MySQL镜像
| 拉取MySQL最新的镜像 docker pull mysql |
2、准备相关yaml文件
准备namespace文件
| cat namespace.yaml apiVersion: v1 kind: Namespace metadata: name: mysqldb |
准备service文件
| cat service.yaml apiVersion: v1 kind: Service metadata: name: mgrtest namespace: mysqldb spec: clusterIP: None selector: name: mysql-mgr ports: - name: foo port: 3306 targetPort: 3306 |
MySQL参数配置文件configmap(节点1)
| 节点1: cat mysql-mgr-cnf-0.yaml apiVersion: v1 kind: ConfigMap metadata: name: mysql-mgr-0-cnf namespace: mysqldb data: mysql-mgr-0.cnf: |
MySQL参数配置文件configmap(节点2)
| cat mysql-mgr-cnf-1.yaml apiVersion: v1 kind: ConfigMap metadata: name: mysql-mgr-1-cnf namespace: mysqldb data: mysql-mgr-1.cnf: |
MySQL参数配置文件configmap(节点3)
| cat mysql-mgr-cnf-2.yaml apiVersion: v1 kind: ConfigMap metadata: name: mysql-mgr-2-cnf namespace: mysqldb data: mysql-mgr-2.cnf: |
准备pod文件节点1
| cat node1_pod.yaml apiVersion: v1 kind: Pod metadata: name: k8s2 namespace: mysqldb labels: name: mysql-mgr spec: nodeName: k8s2 hostname: k8s2 subdomain: mgrtest containers: - image: mysql:latest name: mysql-mgr-0 imagePullPolicy: IfNotPresent command: [ "/bin/bash", "-ce", "cd /usr/bin && mysqld --initialize-insecure --user=mysql && mysqld_safe && tail -f /dev/null" ] ports: - containerPort: 3306 volumeMounts: - name: tz-config mountPath: /etc/localtime - name: mysql-data mountPath: /data/mysql/data/ - name: mysql-config mountPath: /etc/my.cnf subPath: my.cnf volumes: - name: tz-config hostPath: path: /etc/localtime - name: mysql-data hostPath: path: /data/mysql/data/ - name: mysql-config configMap: name: mysql-mgr-0-cnf items: - key: mysql-mgr-0.cnf path: my.cnf |
准备pod文件节点2
| cat node2_pod.yaml apiVersion: v1 kind: Pod metadata: name: k8s3 namespace: mysqldb labels: name: mysql-mgr spec: nodeName: k8s3 hostname: k8s3 subdomain: mgrtest containers: - image: mysql:latest name: mysql-mgr-1 imagePullPolicy: IfNotPresent command: [ "/bin/bash", "-ce", "cd /usr/bin && mysqld --initialize-insecure --user=mysql && mysqld_safe && tail -f /dev/null" ] ports: - containerPort: 3306 volumeMounts: - name: tz-config mountPath: /etc/localtime - name: mysql-data mountPath: /data/mysql/data - name: mysql-config mountPath: /etc/my.cnf subPath: my.cnf volumes: - name: tz-config hostPath: path: /etc/localtime - name: mysql-data hostPath: path: /data/mysql/data/ - name: mysql-config configMap: name: mysql-mgr-1-cnf items: - key: mysql-mgr-1.cnf path: my.cnf |
准备pod文件节点3
| cat node3_pod.yaml apiVersion: v1 kind: Pod metadata: name: k8s4 namespace: mysqldb labels: name: mysql-mgr spec: nodeName: k8s4 hostname: k8s4 subdomain: mgrtest containers: - image: mysql:latest name: mysql-mgr-2 imagePullPolicy: IfNotPresent command: [ "/bin/bash", "-ce", "cd /usr/bin && mysqld --initialize-insecure --user=mysql && mysqld_safe && tail -f /dev/null" ] ports: - containerPort: 3306 volumeMounts: - name: tz-config mountPath: /etc/localtime - name: mysql-data mountPath: /data/mysql/data - name: mysql-config mountPath: /etc/my.cnf subPath: my.cnf volumes: - name: tz-config hostPath: path: /etc/localtime - name: mysql-data hostPath: path: /data/mysql/data/ - name: mysql-config configMap: name: mysql-mgr-2-cnf items: - key: mysql-mgr-2.cnf path: my.cnf |
3、创建namespace,service,configmap,pod
| kubectl create -f namespace.yaml kubectl create -f service.yaml kubectl create -f mysql-mgr-cnf-0.yaml kubectl create -f mysql-mgr-cnf-1.yaml kubectl create -f mysql-mgr-cnf-2.yaml kubectl create -f node1_pod.yaml kubectl create -f node2_pod.yaml kubectl create -f node3_pod.yaml |
4、创建完成后查看状态
| 1.查看pods状态(看到node节点的mysql已经在运行) # kubectl get pods -n mysqldb -o wide NAME READY STATUS RESTARTS AGE IP NODE NOMINATED NODE READINESS GATES k8s2 1/1 Running 0 112s 172.16.109.65 k8s2 k8s3 1/1 Running 0 112s 172.16.219.1 k8s3 k8s4 1/1 Running 0 111s 172.16.106.129 k8s4 |
5、配置MySQL8MGR
#节点1操作
kubectl exec -it k8s2 -n mysqldb /bin/bash alter user root@localhost identified by Mysql123!@#; set sql_log_bin=0; create user rpl_user@% identified by Rpl_pass@123; grant replication slave on *.* to rpl_user@%; flush privileges; set sql_log_bin=1; change master to master_user=rpl_user,master_password=Rpl_pass@123 for channel group_replication_recovery; install PLUGIN group_replication SONAME group_replication.so; reset master; set global group_replication_single_primary_mode=FALSE; set global group_replication_enforce_update_everywhere_checks=TRUE; set global group_replication_bootstrap_group=ON; start group_replication; set global group_replication_bootstrap_group=OFF; select * from performance_schema.replication_group_members; 1节点执行完后可以看到状态图  |
节点2操作
kubectl exec -it k8s3 -n mysqldb /bin/bash set sql_log_bin=0; create user rpl_user@% identified by Rpl_pass@123; grant replication slave on *.* to rpl_user@%; flush privileges; set sql_log_bin=1; change master to master_user=rpl_user,master_password=Rpl_pass@123 for channel group_replication_recovery; install PLUGIN group_replication SONAME group_replication.so; reset master; set global group_replication_single_primary_mode=FALSE; set global group_replication_enforce_update_everywhere_checks=TRUE; set global group_replication_recovery_get_public_key=on; start group_replication; select * from performance_schema.replication_group_members;  |
节点3操作
kubectl exec -it k8s4 -n mysqldb /bin/bash set sql_log_bin=0; create user rpl_user@% identified by Rpl_pass@123; grant replication slave on *.* to rpl_user@%; flush privileges; set sql_log_bin=1; change master to master_user=rpl_user,master_password=Rpl_pass@123 for channel group_replication_recovery; install PLUGIN group_replication SONAME group_replication.so; reset master; set global group_replication_single_primary_mode=FALSE; set global group_replication_enforce_update_everywhere_checks=TRUE; set global group_replication_recovery_get_public_key=on; start group_replication; select * from performance_schema.replication_group_members;  |
配置完MGR后状态****为多主状态

6、配置过程中问题及处理
问题namespaces"mysqldb" already exists
创建mysqldb的namespace时,因为已经存在一个mysqldb的namespace,报错如下:
kubectl create -f namespace.yaml Error from server (AlreadyExists): error when creating "namespace.yaml": object is being deleted: namespaces "mysqldb" already exists 查看状态也是Terminating的 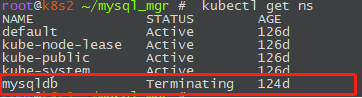 |
解决方式
1.获取mysqldb的namespace下json格式文件 # kubectl get namespace mysqldb -o json > /tmp/mysqldb.json 2.删除掉spec里面指定的内容 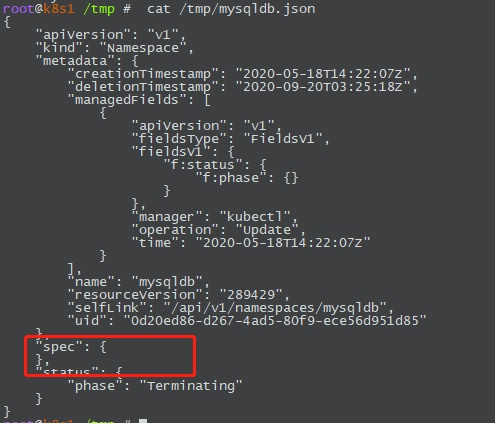 3.新开一个终端窗口执行kubectl proxy --port=8081,监听本地 # kubectl proxy --port=8081 Starting to serve on 127.0.0.1:8081 4.执行 # curl -k -H "Content-Type: application/json" -X PUT --data-binary @mysqldb.json http://127.0.0.1:8081/api/v1/namespaces/mysqldb/finalize 注意以上替换mysqldb名字 5.执行完后,查看namespace,mysqldb的Terminating状态已经没有了 3.新开一个终端窗口执行kubectl proxy --port=8081,监听本地 # kubectl proxy --port=8081 Starting to serve on 127.0.0.1:8081 4.执行 # curl -k -H "Content-Type: application/json" -X PUT --data-binary @mysqldb.json http://127.0.0.1:8081/api/v1/namespaces/mysqldb/finalize 注意以上替换mysqldb名字 5.执行完后,查看namespace,mysqldb的Terminating状态已经没有了 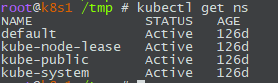 |
End